Effort is not work. Carrying a piano up the stairs is the same amount of work as using an elevator, but tremendously more effort.
Your focus should be on delivering quality code, not the intricacies of deployments. It should be as easy as:
- Deploy Infrastructure
- Deploy Code
- Repeat as necessary
Until recently I worked in a SOX-compliant on-premise IIS shop. SOX regulations are there for good reason but they are a huge burden if every deploy and config change is done and documented manually. Our deployments were usually an all-hands-on-deck affair, and scheduling an automated deployment seemed like a pipe dream. It once took infrastructure months to enable SSL on our site! Having moved to a cloud-first shop it all just seems like so much unnecessary effort.
Prerequisites
- NodeJS & Angular CLI
- AWS CLI Installed & Credentials Configured
- Route53 Domain & Amazon Certificate Manager cert for the domain
(Needed for custom domain name and HTTPS) - Optional: Clone the tutorial repository:
https://github.com/ibliskavka/aws-angular-stack-starter
Deploy Infrastructure
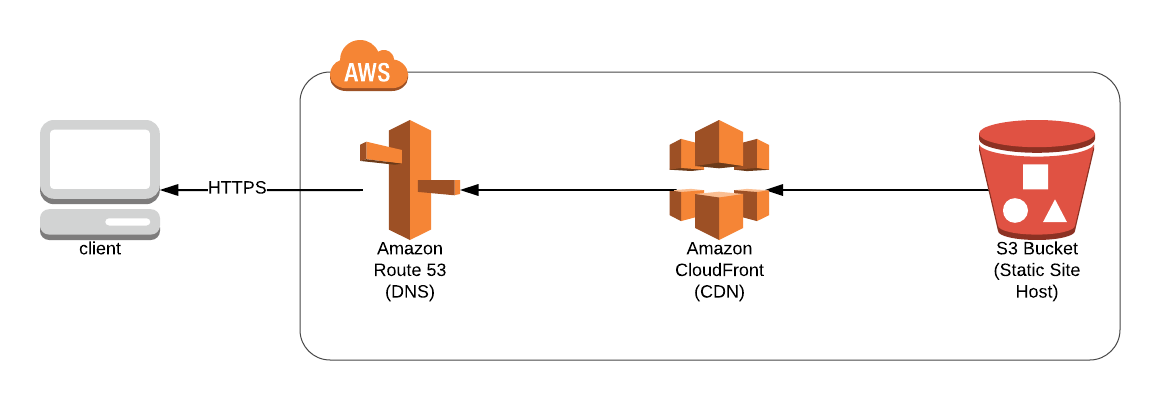
In AWS infrastructure-as-code is done with CloudFormation templates. We will deploy the following resources with our template.
- S3 Bucket - for hosting our Angular App
- CloudFront Distribution - CDN for our Angular App. Also handles error redirects for SPA routes and SSL
- Route53 DNS Entries - Everybody loves pretty domain names
The annotated stack template can be found here:
https://github.com/ibliskavka/aws-angular-stack-starter/blob/master/stack/template.yml
Once you download the template you can install it with the following CLI command:
1 | aws cloudformation deploy \ |
Note: Replace the asterisks with your own values
It took almost 25 minutes to build my stack. Stack completion time varies but in general CloudFront distributions take ~20 minutes to create. All the more reason to script your deploys. You can check the detailed status (or errors) in the AWS web console.
Upon completion, you will receive a message like:
1 | Waiting for changeset to be created... |
Open up the web console to see your stack outputs or run the following command:
1 | aws cloudformation describe-stacks \ |
Deploy Code
I recommend pulling a sample angular app for this tutorial. I included one in the tutorial repository.
Add a script in package.json that looks like this:
1 | "deploy": "ng build --prod --aot |
Note: Replace {AppBucket} & {DistributionId} with your stack outputs.
What this does
- Builds the angular app for production
- Syncs the built app to your S3 bucket
- Creates a CloudFront invalidation so that edge locations would get the latest build. (optional)
Deploy your code with the following commandnpm run deploy
That’s it! Now your app is deployed to AWS!
Cleanup
Cleaning everything up is even easier than putting it up. There is no reason to pay for environments that are not in use!
The following commands will delete your bucket contents and then delete the stack.
1 | aws s3 rm s3://{AppBucket} --recursive |
Note: Replace {AppBucket} with your stack output
Conclusion
This may seem like if overkill you only have one toy app. If you are producing a bunch of apps and have multiple environments this becomes an amazing time saver.
If the policy states that you can’t deploy your own code, your ops guys will love this! Additionally, any infrastructure changes are explicitly documented in your source control.